Methods
Methods Of Construction
Ferro-cement Boatbuilding
Over the last hundred years there have been almost as many different methods of building ferroboats tried, as the years that have passed.
Almost all have fallen by the wayside because of a lack of understanding of 5 basic principles.
1/ The transferring of stresses from an impact.
2/ The incompatability of mixed materials.
3/ The effects of Osmosis.
4/ The ability to be repaired.
5/ The ease of fitting out.
There are 'for's and against's', for every method. Every method has it's drawbacks.
If the design/method does not include built in floors, it should not be contemplated under any circumstances. If the design/method does not include frames, there are serious drawbacks that should be considered.
There are three basic methods of construction.
a/ Hand lay-up of netting/mesh on a rod matrix.
b/ Hand lay-up over a mould.
c/ Shot blast method.
IMPORTANT NOTE
The only types of netting/mesh suitable for marine use is either galvanised netting of half inch dia hexagonal known as 'Bird Netting', or half inch square welded mesh. In a concrete/ferro-cement compound 'Bird Netting' is greater in strength, flexibility and impact resistance. Do not use 'Chicken wire/netting' it has 1 inch hexagonal dia spacings and so does not contain enough steel content.
DANGER
Under no circumstances use 'expanded wire', often sold as 'expandamet'. it is manufactured from a flat sheet of steel by cutting small slots and expanding it. In a concrete/ferro-cement compound it has a very poor impact resistance. The layers are not integrated as with netting and so seperate easily under impact. Experience has shown that the very few vessels that have used this method of lay-up have mostly been condemned after very little use, and larger ones found unable to support their own weight on the hardstanding.
a/ Hand lay-up of netting/mesh on a steel rod matrix, is the only method worth considering for amateur ferro-cement boat construction. Time has proved the method to be the best in almost every aspect. It's only drawback is that it is a more time consuming construction process than methods.
b/ and c/ However having said that, the latter two methods are only a by-product of attempts to find quicker ways of construction for commercial cost-saving production purposes.
The disasterous effects of grounding on reefs and rocks, of ferro-cement keeled vessels (infact a monocoque constructed hull of almost any material), which have not been constructed with integral floors, has been well in evidence over the last 50 years or so. If you add to the previous analysis the considerably increased difficulties of fitting out a hull without frames. There is logically no practical reason to consider building a frameless or floorless hull. To this end I will only outline the basic two variations of this method of construction ie...'The Hartley Truss Frame method', and 'The Pipe Frame method'.
The Hartley Truss-frame Method
The first stage is to construct a set of frames from m/s rod. These frames have integral floors and sometimes gussets to spread loading for chainplates or other fittings. Stage 2 is to hang the frames and transom at pre-determined centres and at the levels corresponding to the building/height line. Stage 3 is to set up the sheer bar. Stage 4 is to add any truss/pipe keel, stem, rim and stern (if a double-ender). Stage 5 is to add the stringers. Stage 6 add diagonals if called for (verticals are of little use, they add weight and thickness with virtually no addition to strength). Stage 6 is to add the netting/mesh. And Stage 7 is to plaster the finished armature.
I have of course over-simplified the process by only giving an outline of the basic stages, without elaborating on how they are actually achieved. An in-depth description of the method can be found in the book 'Ferro-cement Boats' by Colin Brookes available from www.hartley-boats.com
The following group of pictures show the stages of a 'Fijian 37', under construction.

The frames have been made and hung at their pre-determined positions.
The frames have been made and hung at their pre-determined positions.

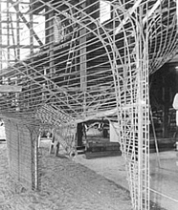
Clearly shows the floors as an integral part of the frames. The box is the mast support box.
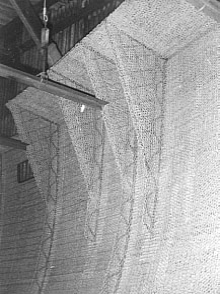
In this picture, the inside of the hull as well as the frames and gussets are now covered with netting. The frame-spreader can be clearly seen also.
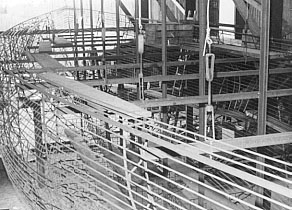
In these two pictures the stringers have now been attatched, as well as sterntube, strengthening gussets and ancilliary items. On this design there are no diagonals called for, so the armature is now ready for the application of the netting/mesh (netting in this instance).

The sheer-bar, stem and keel pipes have been fitted in place on the hanging frames.
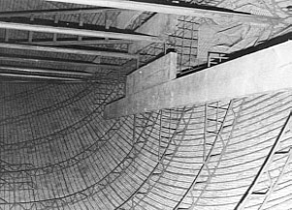
The netting has been applied to the outside of the armature only. The strengthening gussets for rigging fittings can be clearly seen on the upper right of the picture. At the top left are the spreaders which also act as the guide to the building-line.


External views of the hull fitted with blanks and now ready for plastering.
For full descriptions read the book
'Ferro-cement Boats'
by Colin Brookes.mSNAME.amRINA.
available at www.hartley-boats.com
